What are Emplorium Triggers?
Triggers are a set of Conditions that, when met, execute specific Actions. They act as an automated “if this, then that” system for your customer interactions. For example:- IF a visitor spends more than 60 seconds on your pricing page, THEN automatically send them a message offering help.
- IF a visitor’s country is “Germany” AND they are on a specific product page, THEN assign a “Germany Sales Lead” tag to their chat.
Building a Trigger: Conditions & Actions
Creating a powerful trigger involves defining precise conditions and the actions Emplorium should take once those conditions are met.1. Conditions: Defining When a Trigger Fires
Conditions are the “if” part of your trigger. You can combine multiple conditions using AND/OR logic to create highly specific targeting rules.Visitor-Based Conditions
Visitor-Based Conditions
These conditions are based on the visitor’s characteristics or behavior on your site.
- Visitor Page URL: The specific URL the visitor is currently viewing.
- Visitor Online: Whether the visitor is currently active on your website.
- Visitor Sends a Message: Triggers when the visitor sends any message.
- Days of the Week: Specific days when the trigger should be active.
- Visitor IP: The IP address of the visitor.
- Visitor Name: The known name of the visitor (requires data to be saved).
- Visitor Email: The known email of the visitor (requires data to be saved).
- Visitor Phone: The known phone number of the visitor (requires data to be saved).*
- Browser Name: The web browser the visitor is using (e.g., Chrome, Firefox).
- Browser Version: The specific version of the visitor’s browser.
- OS Name: The operating system of the visitor’s device (e.g., Windows, macOS, Android).
- Device Type: The type of device (e.g., Desktop, Mobile, Tablet).
- Visitor Country: The detected country of the visitor based on IP address.
Agent-Based Conditions
Agent-Based Conditions
These conditions are based on the availability of your agents.
- If Agent Online: Triggers if at least one agent is currently online.
- If Agent Offline: Triggers if no agents are currently online.
Conditions that rely on “visitor values” (e.g., Name, Email, Phone) will only work if that data has already been collected and saved to the visitor’s profile (e.g., via a form in a Flow or manual input by an agent).
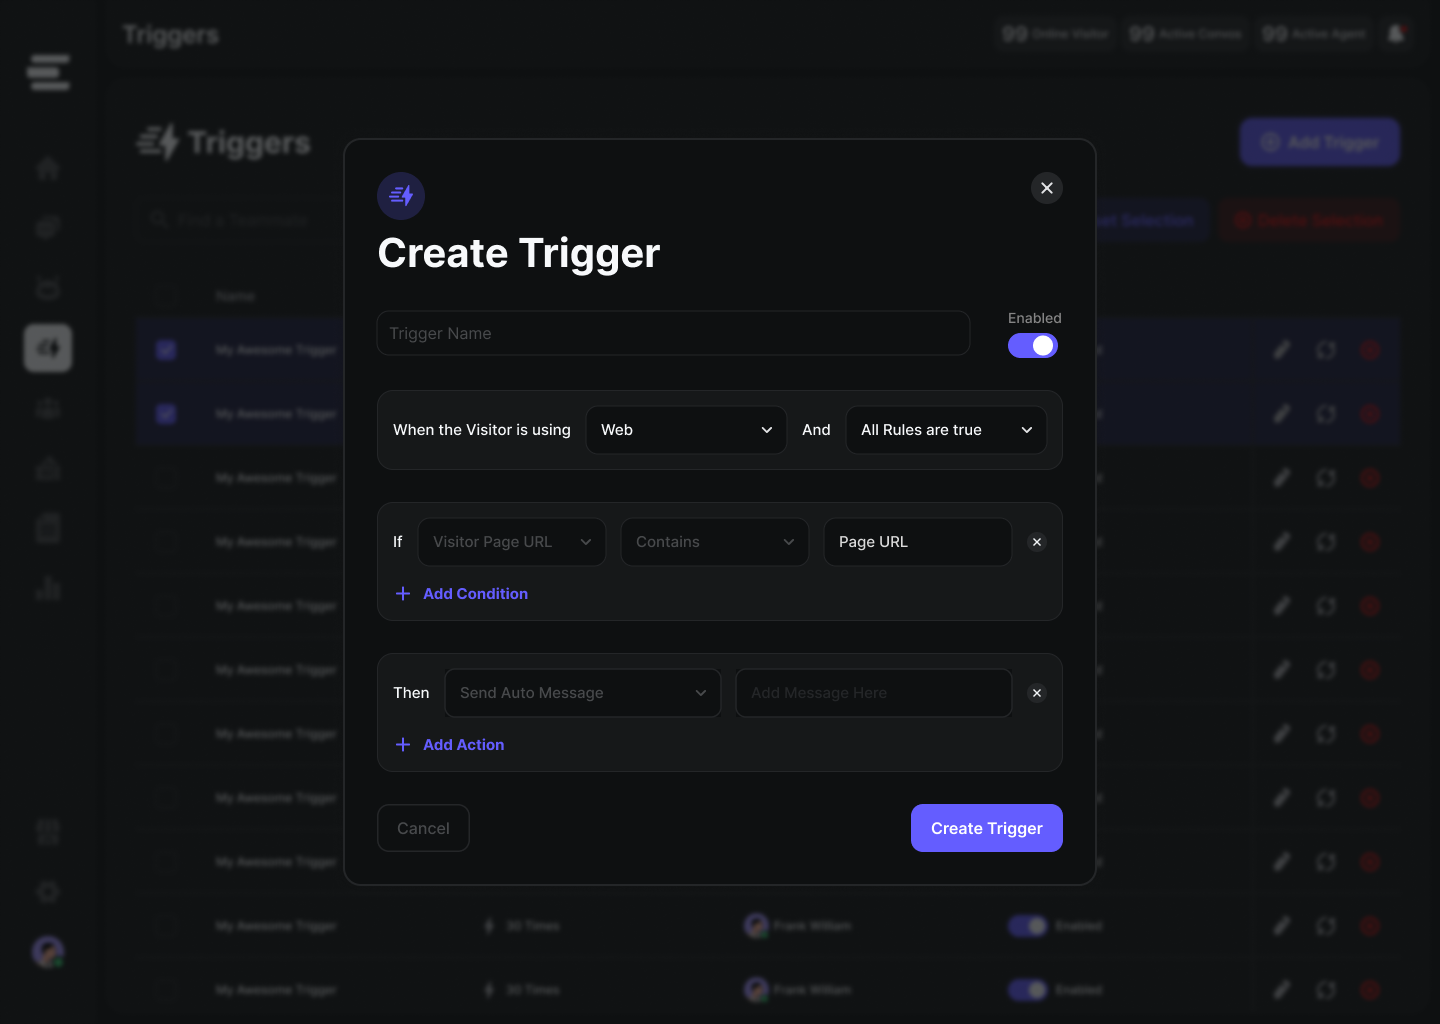
2. Actions: What the Trigger Does
Actions are the “then that” part of your trigger, executed when all specified conditions are met.- Send Auto Message: Automatically sends a predefined message to the visitor. This message will be sent every time the conditions are met.
- Send First Message: Automatically sends a predefined message, but only one time per visitor when the conditions are first met. Ideal for welcome messages or initial prompts.
- Assign Tag: Automatically applies a specific tag to the visitor’s chat (e.g.,
pricing-interest,abandoned-cart). - Assign Agent: Automatically assigns the chat to a specific agent.
- Assign Department: Automatically assigns the chat to a specific department.
Common Use Cases for Triggers
Triggers are incredibly versatile. Here are some ways you can leverage them to enhance your customer engagement:Proactive Greetings & Onboarding
Trigger a personalized welcome message or an onboarding flow when a new visitor lands on your site or reaches a specific page for the first time._Example: If
Visitor Page URL contains /onboarding, THEN _Send First Message: "Welcome! Need help getting started?"Sales & Lead Qualification
Identify high-intent visitors and offer timely assistance to convert them into leads.Example: If
Visitor Page URL contains /pricing AND Time on Page > 30 seconds, THEN Send Auto Message: "Our sales team is available to answer any questions about pricing!"Support & Self-Service
Guide visitors to relevant resources or connect them with support when they seem to be struggling.Example: If
Visitor Page URL is /troubleshooting AND Time on Page = 60 seconds, THEN Send First Message: "It looks like you're on our troubleshooting page. Can I help you find a solution?"Re-engaging Abandoned Sessions
Send a reminder or offer help to visitors who might be about to leave without completing a key action.Example: If
Visitor Page URL contains /checkout AND Visitor is Online is false (after a short delay), THEN Send First Message: "Did you encounter any issues with your checkout?"Localized Support
Route visitors to specific agents or departments based on their geographic location or language preference (when multi-language support is available).Example: If
Visitor Country is Germany, THEN Assign Department: "German Support"Managing Your Triggers
- Activation Status: Easily toggle triggers
OnorOffas needed without deleting them. - Prioritization: (Coming Soon) Set an order of priority for triggers, especially if multiple conditions could overlap.
- Testing: Utilize the Virtual Visitor feature to test your trigger configurations in a sandbox environment before deploying them live.
Best Practices for Effective Trigger Usage
1
Start Simple
Begin with one or two clear triggers to get comfortable with the functionality. Avoid overly complex
AND/OR logic initially.2
Define Clear Goals
Before creating a trigger, identify what you want to achieve (e.g., reduce bounce rate on a specific page, increase demo requests).
3
Avoid Overwhelm
Don’t bombard your visitors with too many messages. Use
Send First Message for initial prompts and ensure your auto messages provide genuine value.4
Test Thoroughly
Always use the <Icon icon=“user-secret” /> Virtual Visitor to simulate scenarios and ensure your triggers fire as expected before going live. This prevents unintended messages or routing issues.
5
Monitor & Refine
Regularly review the performance of your triggers. Are they achieving their goals? Do visitors respond positively? Adjust conditions and messages based on your analytics.
6
Pair with Flows (Advanced)
For more complex interactions after a trigger fires (e.g., asking multiple questions, collecting specific data), consider using a Flow instead of a simple trigger.
Next Steps
- Explore Flows for Advanced Automation - Build multi-step conversations and data collection workflows.
- Learn about Aura AI - Integrate intelligent responses into your automated messages.
- Use the Virtual Visitor - Test your triggers and other configurations safely.